Full-thickness skin graft Case 1 Temple region
Authors: Eirini Tsigka, MD, MSc, Christian Kaare Paaskesen Med. Stud. and Magnus Avnstorp, MD.
Patient History
63-year old woman with biopsy verified Squamos Cell Carcinoma in the left temporal region. The woman is known with previously laryngeal cancer. There was indication for excision of tumor in a 1cm margin including subdermal tissue and reconstruction using a full-thickness skin graft.


Before and after
Pre-operative considerations
- Planning the operative technique of reconstruction – deciding the appropriate donor site:
- The patient had a history of radiation to the laryngeal region due to laryngeal cancer. Therefore a donor site distant from the head and neck area was chosen.
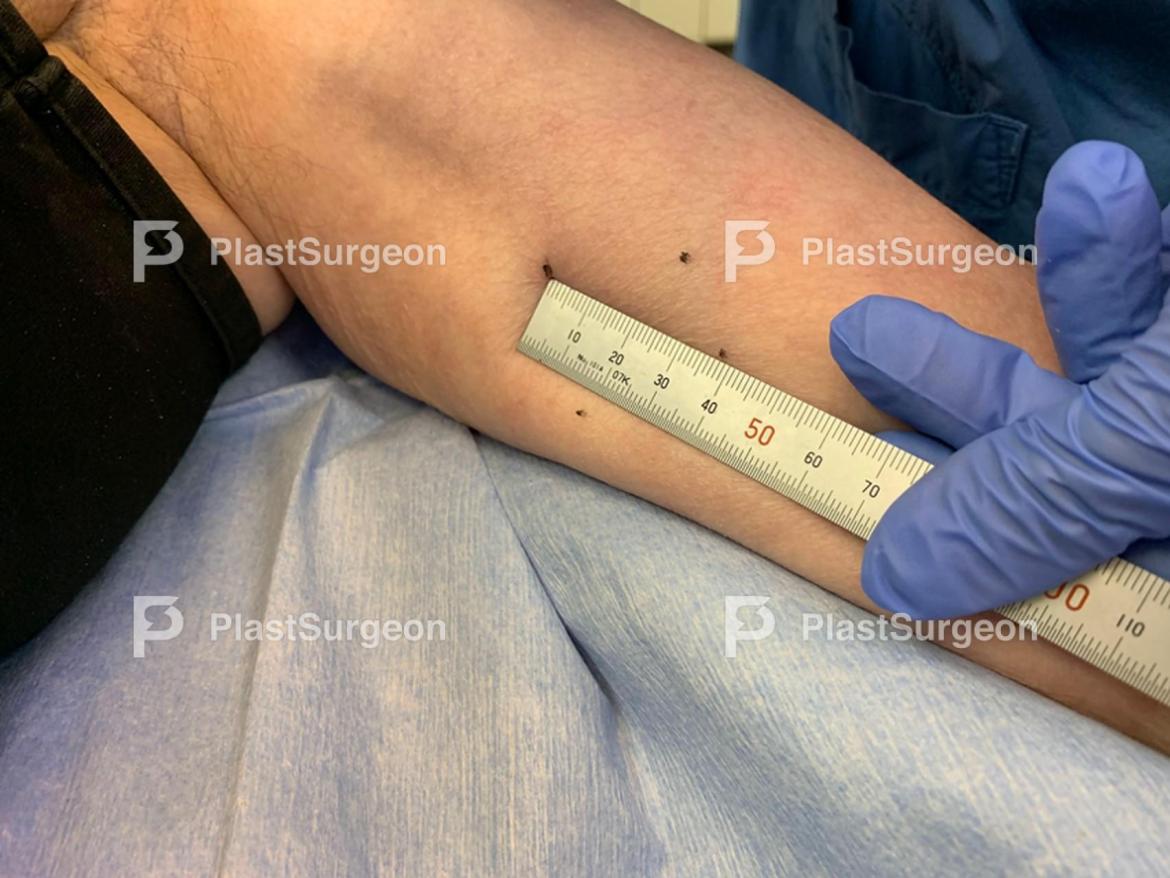
- In this case skin from the left brachial groove was chosen (moderate thin skin with the possibility of thinning, available skin excess).
Step 1: Pre-operative drawing
1×1.5 cm tumor on the left temple, drawing of 1 cm margins.

Step 2: Pinch test
Direct closure would lead to considerable tension of the left lateral canthus, resulting in a less aesthetic results.

Step 4: Recipient site
Recipient site is planned slightly smaller than the donor site, to match in size after contraction of the graft.
Step 5: Donor site
Donor site is planned slightly larger than the recipient site (0,5-1 mm), to match in size after contraction of the graft.

Step 6: Local anesthesia
Local anesthesia is applied in both recipient and donor site.

Step 7: Repeated preoperative marking
Repeated preoperative marking before excision after disinfection and cleaning. Always respect the anatomy in the operative areas. The temporal branch of the facial nerve (VII) is exposed superficially due to thin subcutaneous tissue in the temple region.

Step 8: Excision of tumor
Excision of tumor including a thin subcutaneous layer of tissue

Step 9: Temporal branch of the facial nerve (VII)

Step 10: hemostasis created on the recipient bed
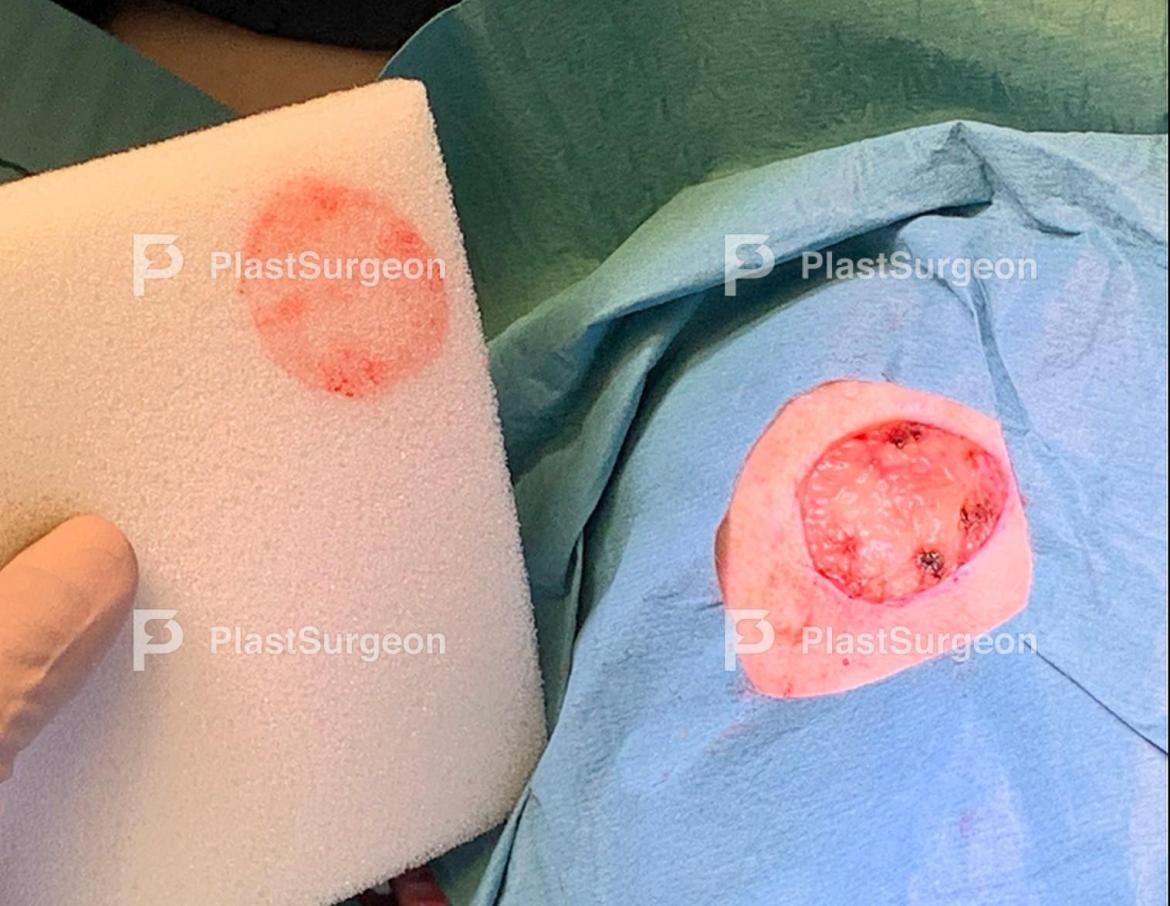
33×35 mm defect, note the hemostasis created on the recipient bed.
Step 11: Excision of graft from the donor site
Excision of graft from the donor site. Note the angle of the scalpel(10 blade) to the tissue.

Step 12: Trim away subcutaneous tissue
Shiny dermis of the graft placed over the index finger after trimming away subcutaneous tissue.

Step 13: Meshing
Two mesh holes are made to avoid hematoma and fluid between recipient site and graft. due to cosmetic reasons, more than 2 mesh holes are recommended in facial grafts.

Step 14: Closing the donor site
Closure of the donor site in two layers. Using absorbable sutures.
Step 15: Bolsters design
A print of the defect used for bolsters design.

Step 16: Bolster and dressing
Bolster and dressing with Vaseline mesh gauze.
- Bolster: Usually consists of two foam pieces, placed on top of the other. The top piece is usually 5 mms wider. (This creates better compression to the skin graft during the first days and maximize survival possibility.)
- Dressing: We use two layers of Vaseline mesh dressing over the skin graft. In areas such as ear, face and suspect infected areas (after a wound revision or an ulcerated tumor) we add with a layer of Nitrofurantoin (antibiotic) dressing mesh.

Step 17: Skin graft is sutured to recipient site
Skin graft is sutured to recipient site with 5-0 running suture.

Step 18: Bolster i placed on the recipient site
Tip: Ask your assistant to place a finger on the bolster until the bolster i secured.

Step 19: Bolster is secured
Bolster is secured with 4-0 running suture, “Blanket stitch”. The patient is informed to keep the area dry one week after operation, until bolster is removed.
Post-operative care
The compressed skin graft is left untouched for at least 5 days to ensure the revascularization into the graft.
A pink skin color is indicating that new vascularization has formed. During the first three days, dermis produces more fibroblast-like cells and the elastin is replaced. Finally, after three weeks, collagen provokes epidermal hyperplasia and within 5 months 85% of collagen has been replaced (compared to 50% in split-thickness skin grafts).

Step 1: Bolster is removed
The sutures of the bolster is being gently removed.

Step 2: Bolster is removed
The sutures of the bolster is being gently removed.
Step 3: Graft observation
5th postoperative day, the graft is almost 100% attached on the wound bed. Lower part of the graft is a bit white, indicating a vulnerable skin graft. This is acceptable. Skin defects are expected at the site of mesh holes.

Step 4: A new bandage is applied
A new bandage is applied. We use vaseline mesh gauze for one more week. exposed to fresh air one hour daily.
References
- Bakers (third edition), Local flaps in facial reconstruction. Shan R. Baker MD FACS.
- Grabb and Smiths (eighth edition). Plastic surgery. Kevin C. Chung.
- Hill TG. Reconstruction of nasal defects using full-thickness grafts: a personal reappraisal. J Dermatol Surg Oncol 1983; 12:995.


